Passkey sovereignty

Your passkeys.
Your phone.
Your call.

A passkey is a key, and a key should belong to the person who uses it. PassKeyChain keeps your passkeys on a phone you choose, under your control: sign in with them on your computer or on the phone itself, and take them with you whenever you want.

🔑 Passkeys in Bitwarden? PassKeyChain lets you use them for hybrid FIDO sign-in: scan the QR code your computer’s browser shows, and your phone signs in with the passkey from your Bitwarden vault. Works on Android 9 and newer.

GPLv3 Android 9+ (API 28) No account needed Keystore-encrypted Sign in on your computer Open import & export

What passkey sovereignty means

Passkeys are a big step up from passwords. But in practice they tend to live inside somebody’s account: your phone maker’s, your browser’s, your password manager’s. You may use them, on their terms, on their devices. PassKeyChain starts from the other end: a passkey is yours, just like a passphrase you know by heart.

🔑

The key is yours

You hold the private key itself, not a pointer to it in someone else’s cloud. You can see which sites and accounts your passkeys belong to, and you can export them again at any moment.

📱

You choose the device

Any passkey you own can sign you in on any computer with Bluetooth and a current browser, from your phone, through the open QR sign-in standard those browsers speak. Phone, browser and passkey don’t have to come from the same company.

🚪

You can always leave

Import and export use open formats: Bitwarden’s, and the FIDO Credential Exchange Format. The app is free software under the GPLv3. Nothing here is built to keep you in, PassKeyChain included.

✋

Nothing happens without you

No account, no server of ours, no telemetry. Every signature, and every new passkey, needs your unlock on your phone, for a site you can see.

⚖️ Sovereignty comes with responsibility. There is no cloud copy to fall back on: lose the phone, and the passkeys on it are gone unless you kept a backup. Keep a password-protected export somewhere safe. An unencrypted export holds every private key, so treat it like the keys to your house.

🌐 The meeting point. Signing in on a computer needs a tunnel server on the internet to bring phone and computer together. By default that is Google’s; it only ever sees encrypted data, and it cannot sign anything (how that works). The phone picks the server, so you can also run your own.

What it does

Everything you need to hold your own passkeys and use them where you want.

🔑

Bring your passkeys

Imports the passkeys from a Bitwarden export, also a password-protected one, and from the FIDO Credential Exchange Format: as a file, or straight from another app through Android’s credential transfer. Delete the export file afterwards: from then on your passkeys live, encrypted, on your phone.

🛡️

Locked to your phone

Your passkeys are sealed with an AES-256-GCM key that lives in the Android Keystore, in hardware where the phone has it. That sealing key never leaves the Keystore, so the stored file is useless anywhere else; your passkeys leave the phone only in an export you make.

📲

Sign in on the phone

Registers as a system passkey provider (Android 14+), so your passkeys are offered when you log in to sites and apps on the phone itself.

🔗

Sign in on your computer

Scan the QR code a computer shows when it asks for a passkey, and your phone completes the sign-in over Bluetooth and an encrypted tunnel. A site’s “create a passkey” code makes a new passkey that is yours from the start. How QR sign-in works →

📤

Take them with you

Exports in Bitwarden’s format, protected with a password if you like: as a backup, or to move to another password manager.

⬆️

Activity log

A short, encrypted log of every sign-in (which site and account, where and when, also attempts that failed or that you cancelled) and every change: passkeys created, deleted, imported or exported. The app also keeps itself up to date from GitHub.

🔒 For passkeys you own. PassKeyChain holds and uses the passkeys of your own accounts, and signs only on the phone, never on a server.

A look at the app

Material 3, with Material You colors on Android 12 and newer. (Renderings of the current build.)

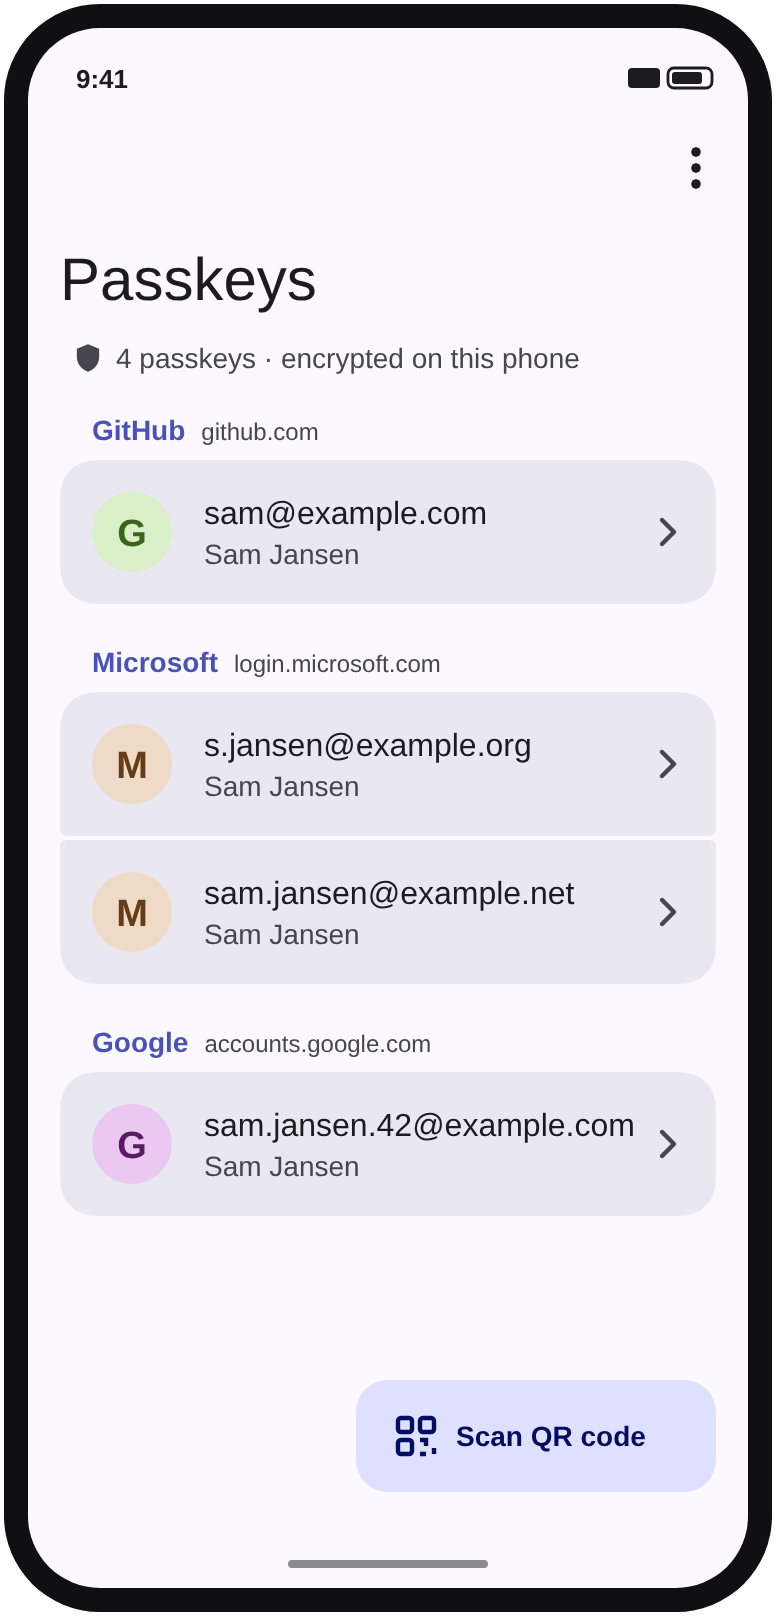
Passkeys grouped per website

Your passkeys, grouped per website.

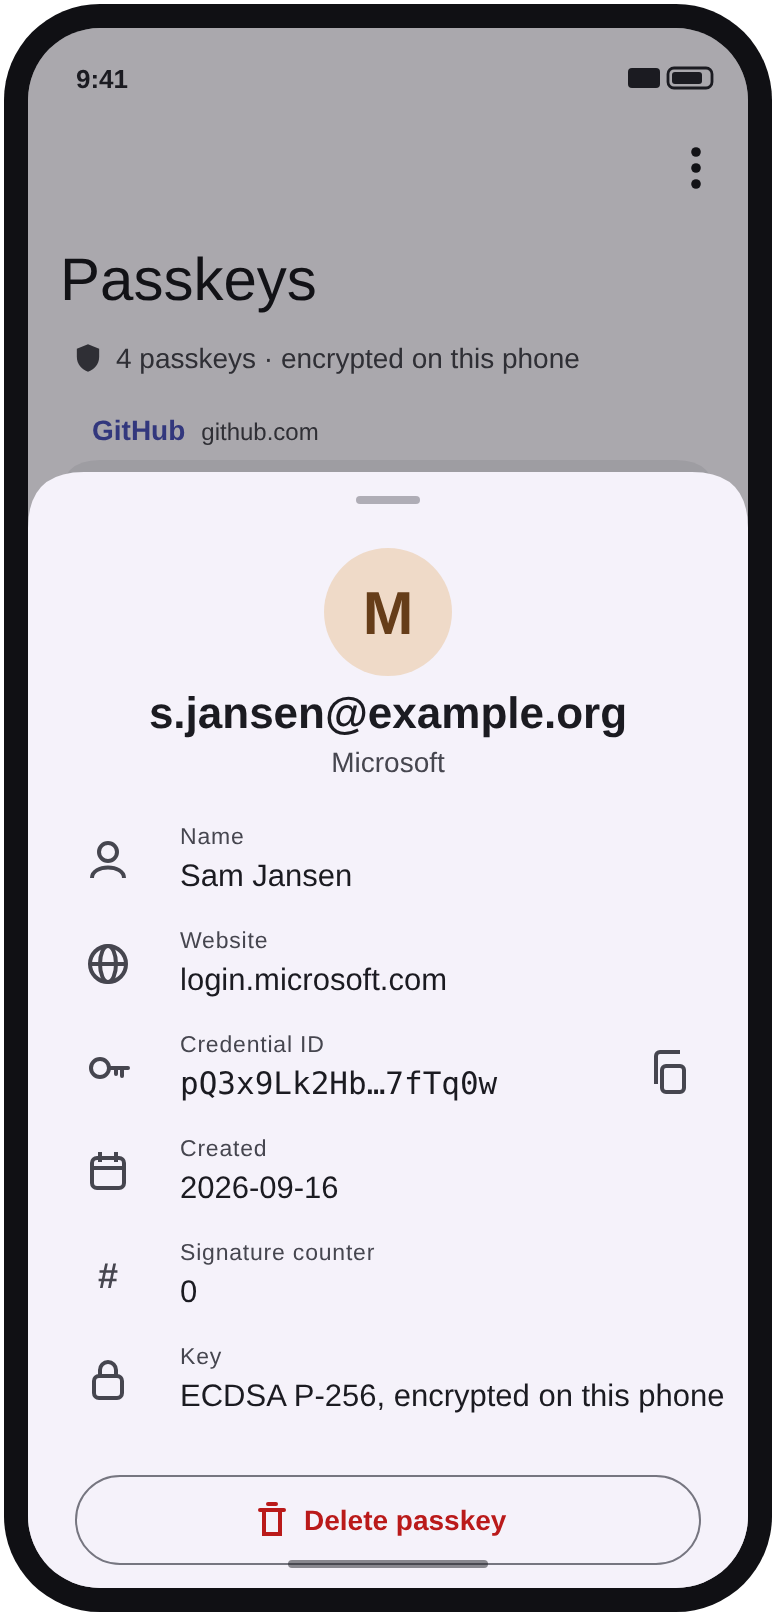
Details of one passkey in a bottom sheet

Details, copy and delete (with undo).

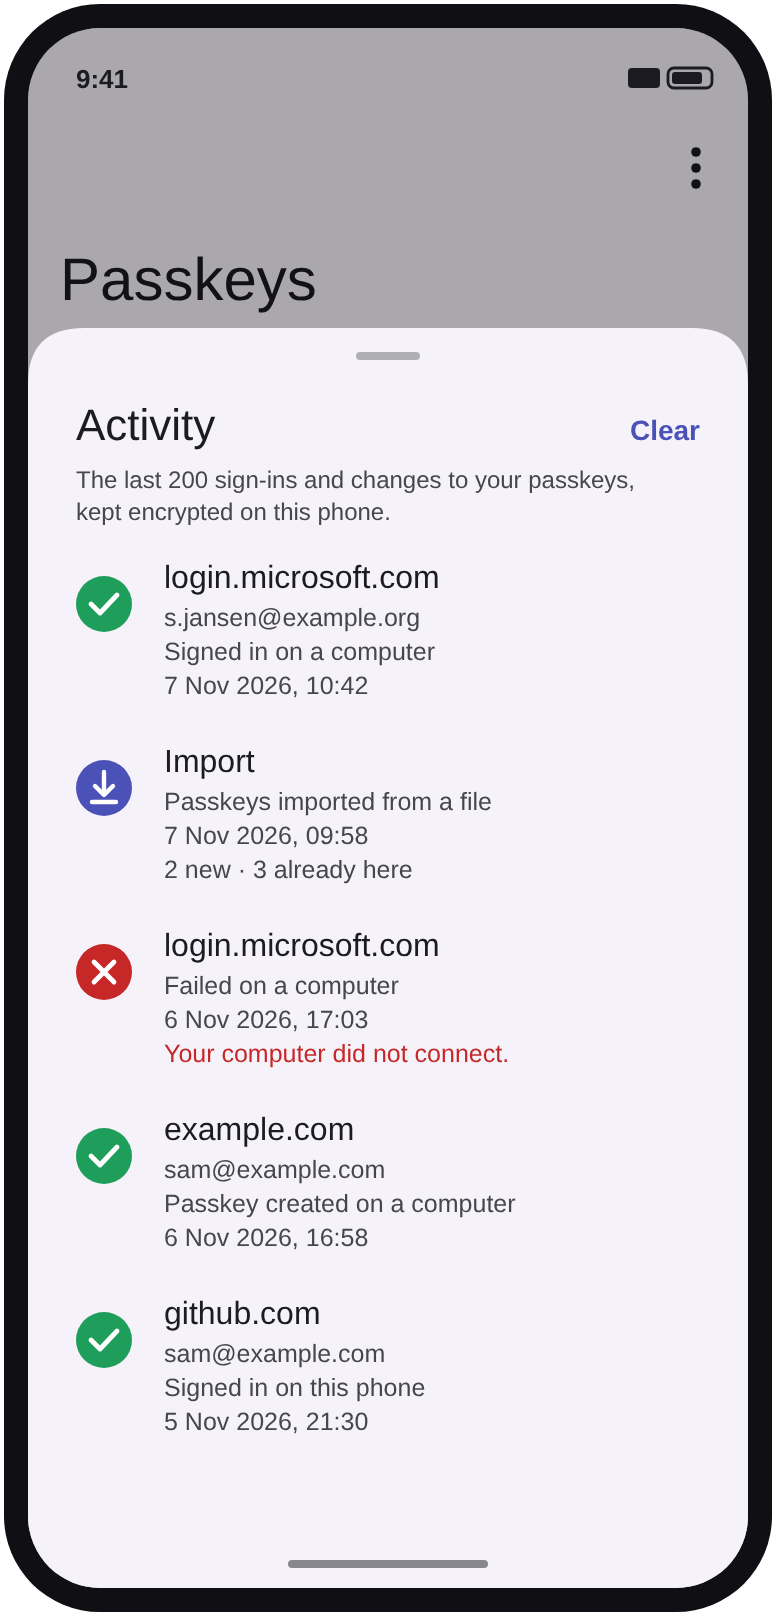
The activity log: sign-ins with site, account, time and outcome, an import, and a created passkey, with green checks, red crosses and an import icon

Activity: every sign-in and every change.

Signing in on a computer

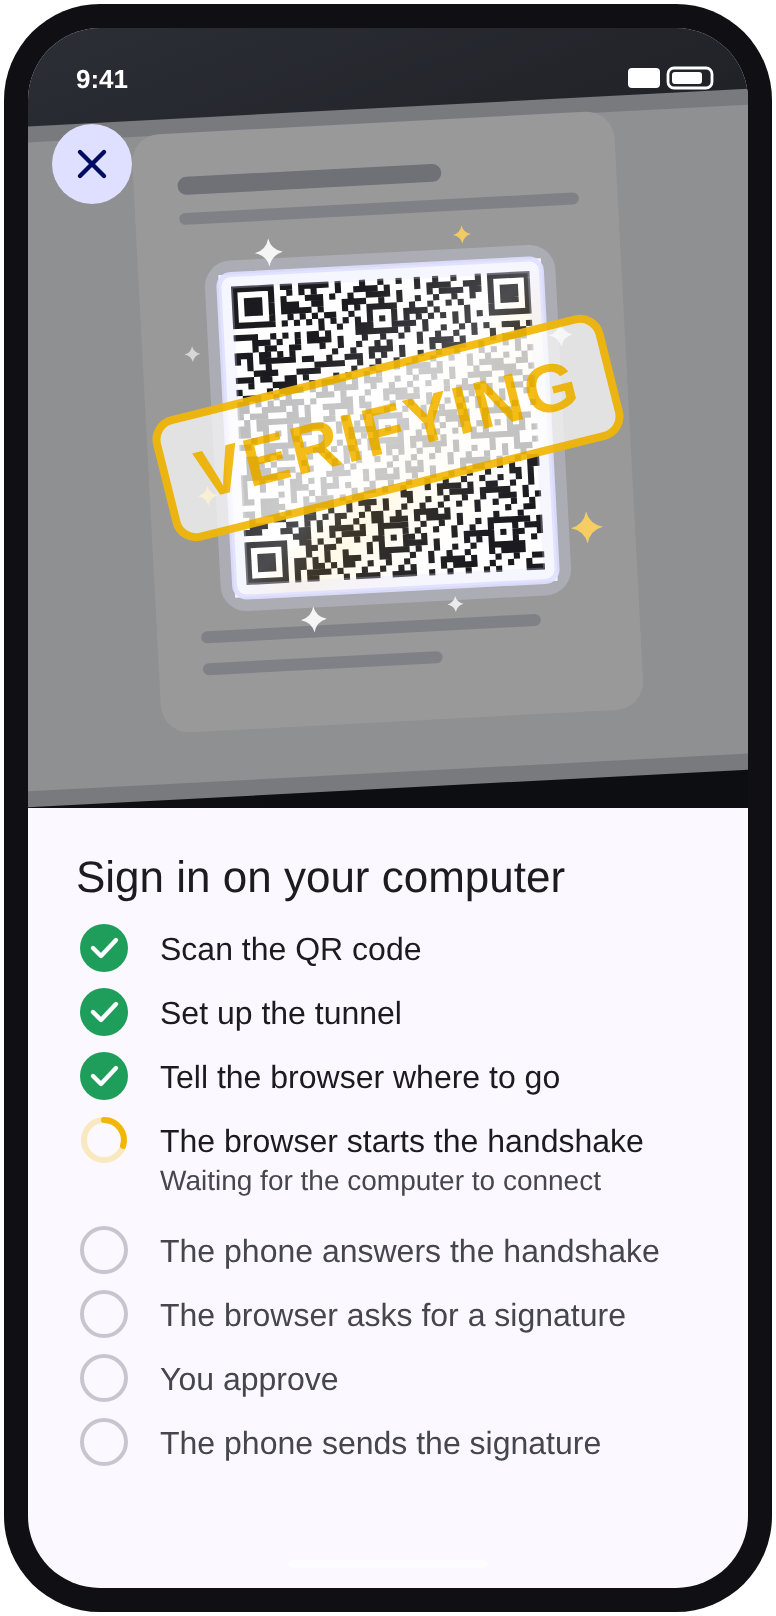
The scanned sign-in QR code with a yellow VERIFYING stamp; below it the eight steps, the first three done and the phone waiting for the computer to start the handshake

Scanned: verifying while the computer connects.

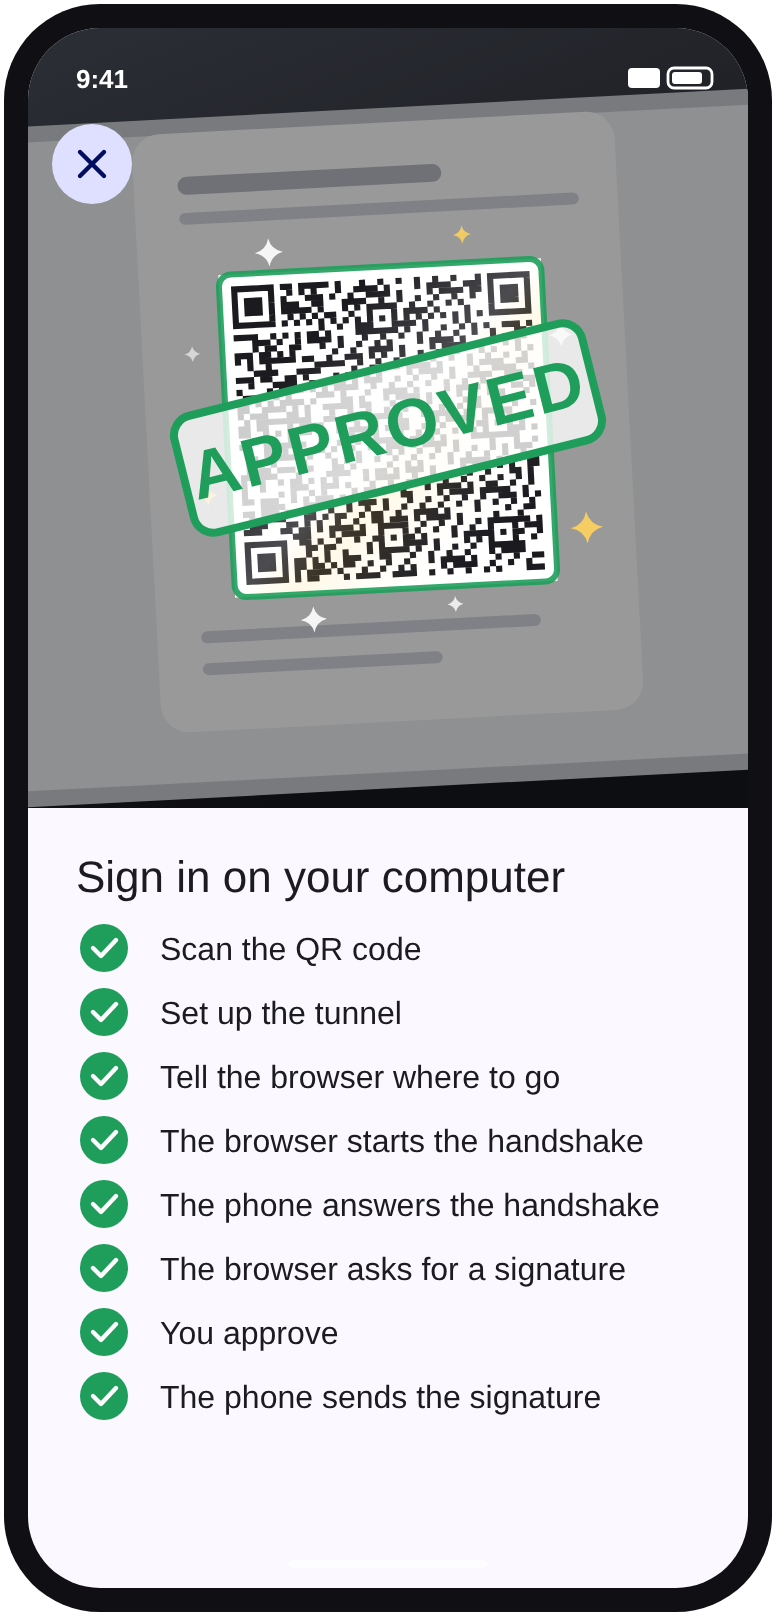
The scanned sign-in QR code stamped APPROVED, above the eight steps, all completed

Approved: you are signed in on the computer.

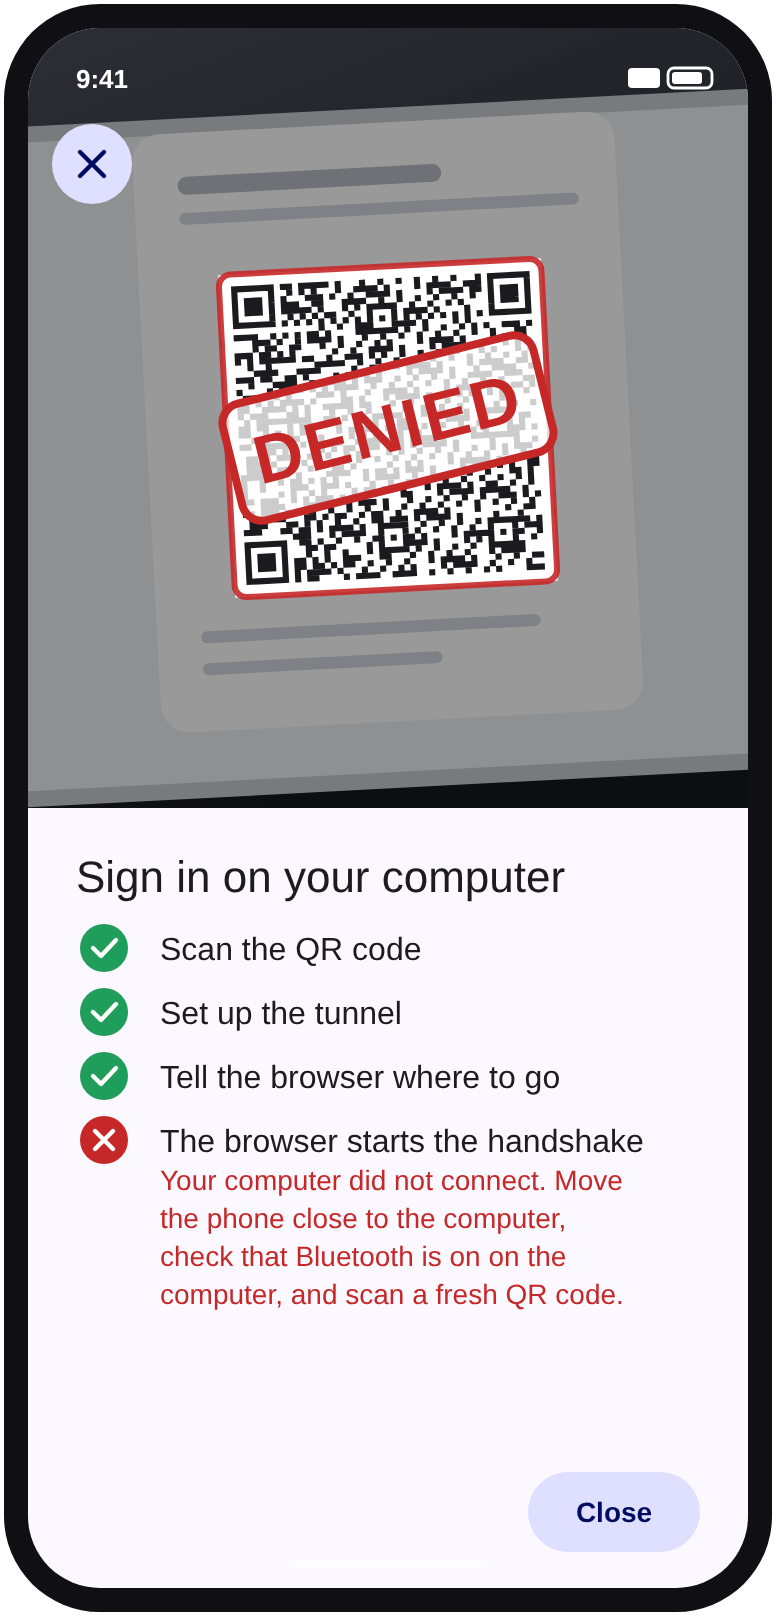
The scanned sign-in QR code stamped DENIED in red; the step where the browser should start the handshake explains that the computer did not connect and what to do

Denied, with what went wrong and what to do.

How signing in with a QR code works

When a website asks your computer for a passkey that lives on your phone, the computer shows a QR code. You scan it, and a few seconds later you are signed in on the computer, without the private key ever leaving your phone. This is what happens in between.

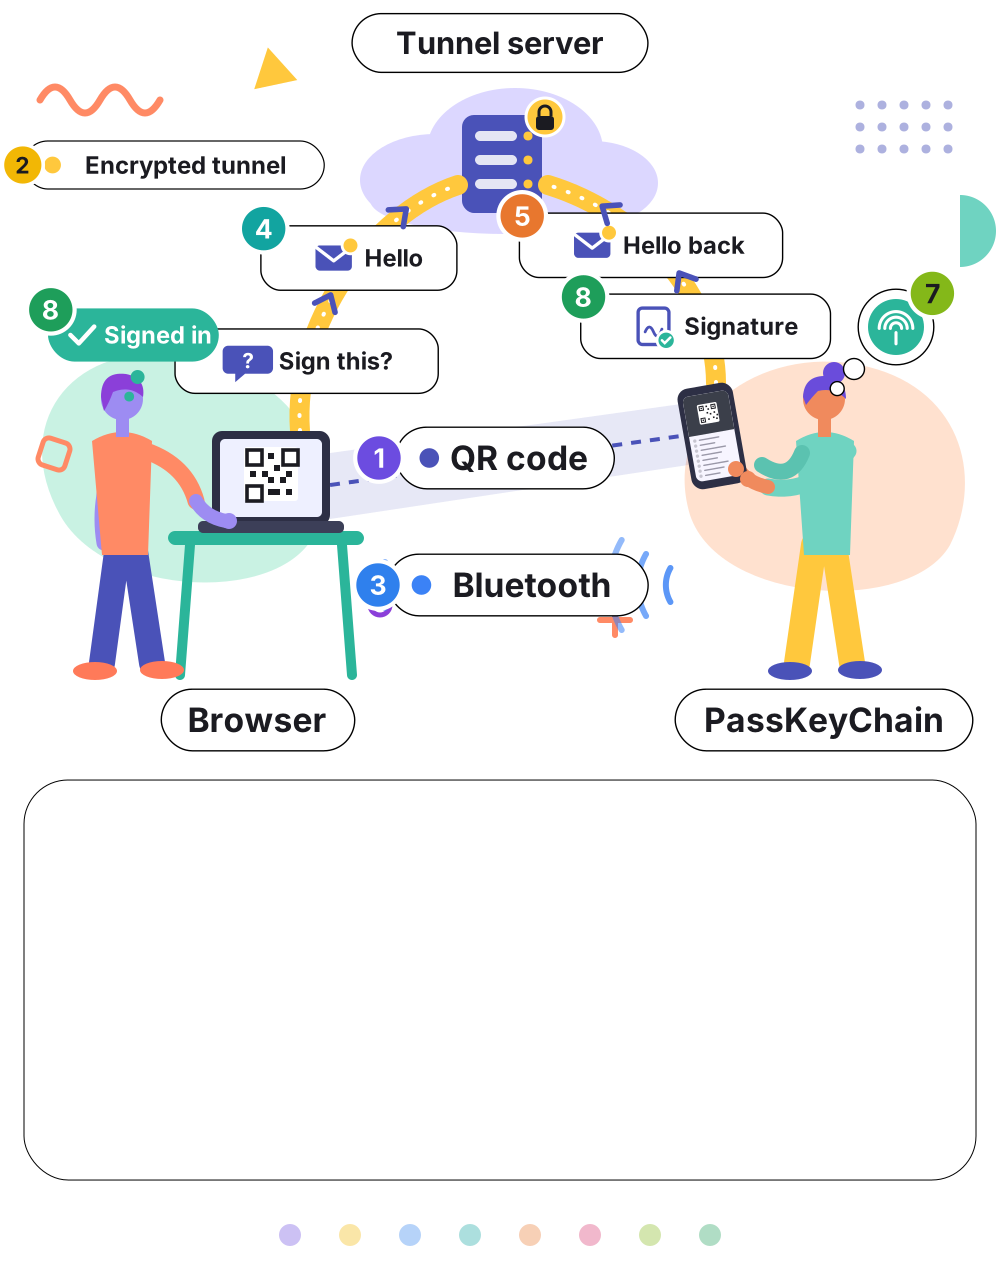
An animation of the eight steps: the browser on a computer, the passkey app on a phone and a tunnel server on the internet, connected by the QR code (step 1), an encrypted tunnel (step 2) and Bluetooth (step 3). Through the tunnel the browser sends Hello (step 4) and Sign this? (step 6); the phone sends Hello back (step 5), you approve with your fingerprint (step 7), and the phone sends the signature (step 8), after which the browser is signed in.
  1. Scan the QR, derive keys

    Computer → phone · QR code

    The QR holds a one-time public key of the browser and a random secret. The phone reads it with its camera, and from that secret both sides compute the same set of keys. The secret itself never travels over the internet.

  2. Set up the tunnel

    Phone → tunnel server · internet

    Phone and computer are often not on the same network, so they meet at a relay on the internet: the tunnel server. The phone connects first and reserves a “meeting room”.

  3. Tell the browser where to go

    Phone → computer · Bluetooth

    The phone sends a short Bluetooth broadcast, encrypted with the keys from the QR, saying which tunnel server and which meeting room to use. Only the computer that showed the QR can read it, and only when it is close by.

  4. The browser starts the handshake

    Computer → tunnel → phone · internet

    The computer connects to the same meeting room and sends the first message of a cryptographic handshake, built from the keys of step 1.

  5. The phone answers the handshake

    Phone → tunnel → computer · internet

    The phone answers. Both sides now share fresh session keys, and everything after this is encrypted end to end.

  6. The browser asks for a signature

    Computer → phone · through the tunnel

    It sends the name of the website and a random challenge from that website. The phone looks up which of your passkeys belong to that website.

  7. You approve

    On the phone · your fingerprint, face or PIN

    The phone shows which website and which account want to sign in, and asks you to unlock. Nothing is signed until you do. Cancel, and the browser simply gets a “no”. With more than one passkey for the site, you pick which one.

  8. The phone sends the signature

    Phone → computer → website

    The phone signs the challenge with the passkey’s private key. The browser hands the signature to the website, which checks it with the public key it saved when you created the passkey. You are signed in.

📍

You have to be in the room

Without the Bluetooth step the browser never learns where to connect. A fake website that shows a real QR to someone far away gets nowhere.

🙈

The tunnel server is blind

It only forwards encrypted data. It cannot read the challenge, the signature or anything else.

🔗

Tied to the real website

The browser only asks for a signature for the website you are actually on, and the signature covers that website’s name, so a look-alike site cannot use it.

This is the FIDO “hybrid” transport, the open protocol that Android phones and iPhones use for this. Because it is open, an independent app can speak it too: PassKeyChain does all eight steps itself, in about 1000 lines of Kotlin, and has signed in to a Microsoft account this way. Passkey sovereignty in practice: your key, your phone, the same front door as everyone else.

Your own Vaultwarden or Bitwarden server

Bring passkeys in from your vault, add new ones to it, or keep both in step.

PassKeyChain signs in to a Bitwarden-compatible server the way Bitwarden’s own apps do, with your server address, email and master password (and a code, if your account asks for one). It decrypts only the passkeys; your passwords and notes stay encrypted. Import fetches them; export first shows which passkeys the vault lacks and adds only those, as new items. Live sync keeps both in step, with a status light in the app: passkeys new in the vault come to the phone, passkeys created on the phone go to the vault, and nothing is deleted on either side.

💡 Tip: a separate account for passkeys. Live sync keeps your vault key on the phone (encrypted by Android’s keystore), and that key opens everything in the account. Use a separate Bitwarden account that holds only your passkeys, so it opens nothing else. A Bitwarden organisation doesn’t separate them: an account’s key opens all of its organisations too. But an organisation is how you share them: put both accounts in one, choose one of its collections for new passkeys in the app, and your main account sees them too, while passkeys it puts there come to the phone.

Run your own tunnel server

The phone decides which tunnel server is used, not the website and not the browser. So you can choose one you run yourself.

In step 2 the phone opens the tunnel, and in step 3 its Bluetooth broadcast tells the browser where that tunnel is. The browser simply follows, and the website never learns which server was used. Android phones use Google’s server; PassKeyChain does too, unless you choose another.

Browsers can reach more servers than Google’s: for numbers 256 to 65535 they compute a hostname themselves, such as cable.wufkweyy3uaxb.com. PassKeyChain’s source code includes a small tunnel server in plain Python and a script that lists those names. Find one that is still free, register it, and run the server.

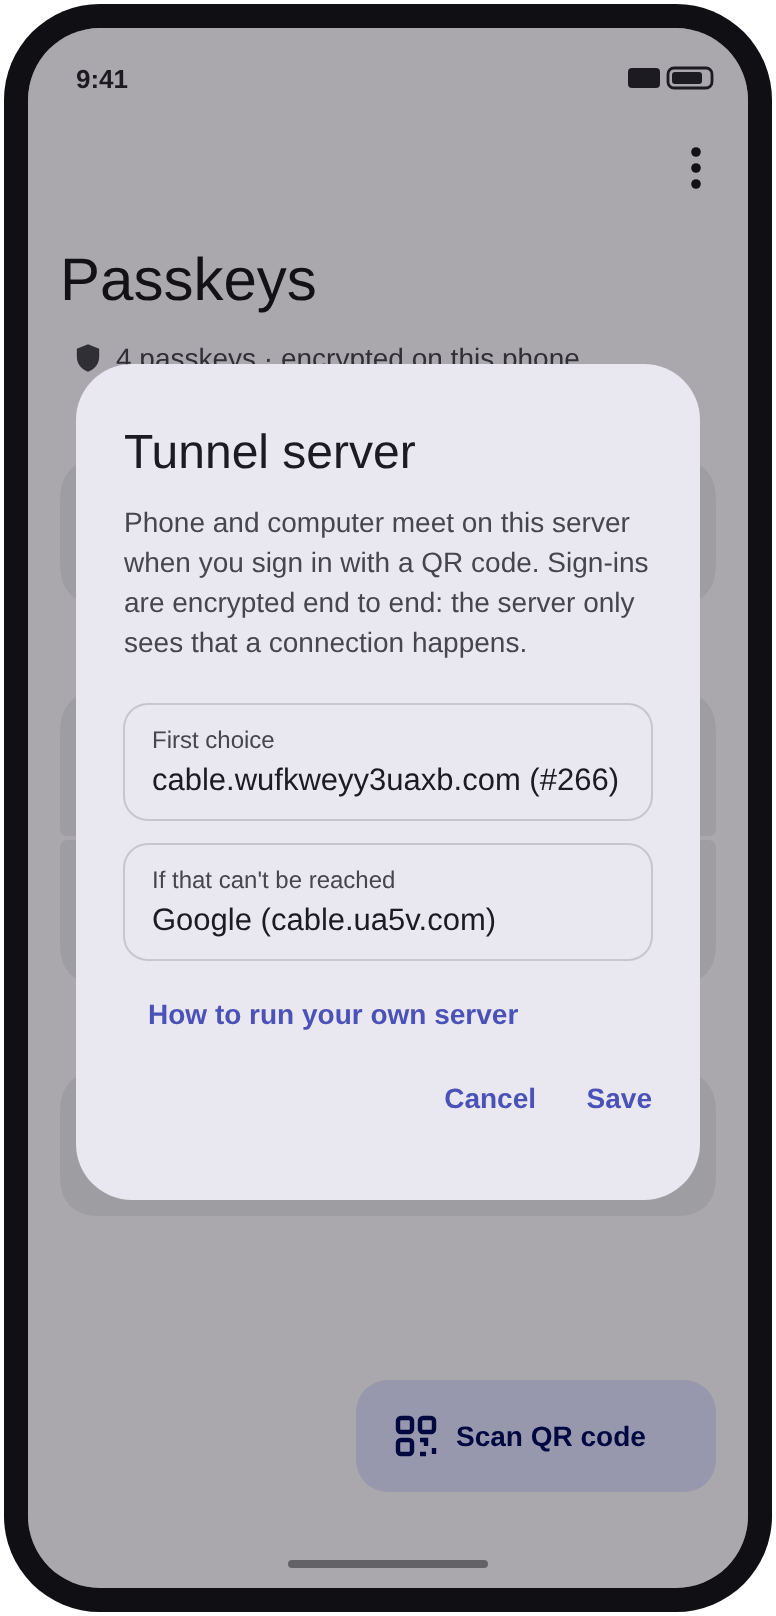
Then, in the app, open the menu and choose Tunnel server. Pick your own server as first choice (type its number to check that the name is yours), and a second choice, such as Google, for when yours can’t be reached. The Activity log notes every sign-in that went through a server other than Google’s.

Sign-ins are encrypted end to end on any tunnel server. Running your own means Google no longer sees when and from where you sign in, and your sign-ins no longer depend on its server. Not yet tried with Chrome on a real server; whether Safari and Firefox accept these computed names is not known yet.

The Tunnel server setting in PassKeyChain: first choice cable.wufkweyy3uaxb.com (number 266), and Google’s cable.ua5v.com if that can’t be reached, with a link on how to run your own server

Your own server first, Google as fallback.